By Audrey Hayes
Updated November 2026
The most useful woodworking tools are the ones that let you measure accurately, cut straight, joint clean edges, and smooth a surface without tearing the grain. If you own a tape measure, a combination square, a crosscut saw or circular saw with a guide, a drill, a block plane, a random orbit sander, and a set of clamps, you can build most of the projects on this site, from birdhouses to a basic bench. This guide explains what each tool does, how it fits into a build, and what to watch for when you start using it.
How to Decide Which Woodworking Tools to Get First
Start with the project, not the catalog. Pick a simple build, such as a birdhouse with a flat roof and a 1-1/8 inch entrance hole, then list every operation it requires: marking, cutting, drilling, joining, fastening, and finishing. Each operation points to a tool. A birdhouse needs accurate measuring, square crosscuts, a hole saw or spade bit, a drill, and sandpaper. A bench adds joinery and clamping, which pushes you toward a saw with a fine kerf and a set of bar or pipe clamps.
Shopping for one? See our guide: The Long Dark Woodworking Tools: 3 Best Picks for Long Reach Work (2026).
Most beginners find that the first ten tools cover 80 percent of their work. Buy measuring and marking tools first, because a cut is only as good as the line you put on the board. Then add cutting, then holding, then smoothing.
Measuring and Marking Tools
Accurate layout is the foundation of every project. Mistakes here compound later, so treat these as the most important tools in the shop.
Tape Measure and Steel Rule
A 25-foot tape is useful for rough dimensions and for checking large assemblies. For project work, a 12-inch steel rule with clear graduations gives you more precision. Check that the end hook is not bent, since it shifts by its own thickness and affects every measurement taken from the end.
Combination Square
A combination square checks 90-degree and 45-degree angles and gauges depth. Use it to confirm that a board’s edge is square to its face before you mark a cut. Run the blade against an edge you trust, then flip the square and check again. If the gap changes, the square is out of true.
Marking Gauge and Pencil
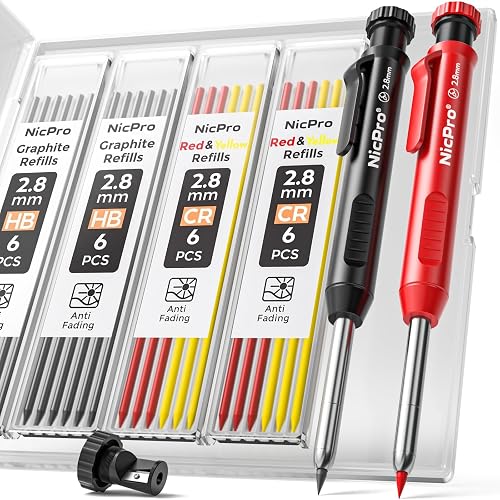
A marking gauge scribes a line parallel to an edge, which is essential for joinery like mortise and tenon. A sharp pencil is fine for rough cuts, but for joints, a knife line gives a crisp edge that a saw can register against. The gauge is one of the most underrated tools in the shop.
Cutting Tools
Handsaw
A crosscut saw cuts across the grain, and a rip saw cuts along it. A single good handsaw, typically 15 to 20 points per inch for general work, handles many tasks without power. Support the workpiece on a bench or sawhorse, keep the kerf on the waste side of your line, and let the saw do the work rather than forcing it.
Circular Saw or Table Saw
A table saw is the workhorse for ripping and crosscutting sheet goods and solid stock to consistent widths. Set the blade height to about 1/8 inch above the workpiece for clean cuts, and always use the rip fence for ripping and a miter gauge or crosscut sled for crosscuts. A circular saw with a straightedge guide is a practical alternative when you cannot fit a table saw in your space.
Jigsaw
A jigsaw cuts curves and interior shapes, such as the arched front of a birdhouse. Use a fine-tooth blade for plywood and a coarser blade for solid wood. Clamp the work firmly and cut slowly to limit tear-out.
Holding and Clamping Tools
Clamps are the most-used tool in most shops, and you can rarely own too many. Glue-ups, dry assemblies, and cutting setups all depend on them.
- Bar or pipe clamps for panels and long assemblies
- F-style or quick-release clamps for small glue-ups
- C-clamps for holding jigs and stops
- A pair of sawhorses or a bench vise for work support
Apply enough pressure to close the joint without crushing the wood. Overtightened clamps can bow a panel or squeeze glue out of the joint, starving it.
Drilling and Boring Tools
A cordless drill driver handles pilot holes, countersinks, and driving screws. For a birdhouse entrance, a hole saw or Forstner bit cuts a clean round hole. Forstner bits leave a flat bottom and work well in end grain, while spade bits are faster but tear out more on the exit side. Back the workpiece with scrap to prevent blowout.
Planing and Smoothing Tools
Block Plane
A block plane trims end grain, chamfers edges, and fits joints. Set the blade for a fine cut and plane with the grain where possible. Angled blade bedding helps with difficult figured wood.
Random Orbit Sander
A random orbit sander speeds up surface preparation. Work through grits in steps, typically 80, 120, then 180 or 220 for most projects. Skipping a grit leaves scratches that show up after finishing. Keep the sander moving and avoid pressing down hard, which can leave swirl marks.
Recommended gear
A few items make the tools above easier to use and more accurate:
- A quality combination square helps you check squareness reliably before every cut. View on Amazon
- A set of bar clamps covers most glue-ups and panel work. View on Amazon
- A hole saw kit makes clean entrance holes for birdhouses. View on Amazon
- A random orbit sander with a dust port keeps the shop cleaner and speeds up sanding. View on Amazon
Step-by-Step: Using These Tools on a Simple Project
Here is how the tools combine on a basic birdhouse with a flat roof, a front panel, two side walls, a back, and a floor:
- Measure and mark all parts on the stock, checking squareness with a combination square.
- Crosscut the parts to length with a handsaw or table saw sled.
- Rip the side walls to width on the table saw, keeping the fence set for consistent results.
- Cut the arched front and entrance curve with a jigsaw, then clean the edge with a sander.
- Bore the entrance hole with a hole saw, backing the front panel with scrap.
- Dry-fit the assembly, then glue and clamp the joints, checking for square as you tighten.
- Sand through the grits, then apply finish.
Common Mistakes
- Trusting a square without checking it. Verify tools against a known straight edge.
- Cutting on the line instead of just outside it. Keep the saw kerf on the waste side.
- Skipping grits when sanding, which shows scratches after finish.
- Overtightening clamps and bowing or starving glue joints.
- Using a dull blade or bit, which causes tear-out and burning.
- Ignoring safety guards and push sticks on power saws. Consult the manufacturer’s manual and a qualified instructor before using any machine.
Tips for Building Your Shop
Buy quality over quantity for measuring tools and clamps, since these affect every project. Sharpen hand tools regularly, because a sharp chisel or plane is safer and more accurate than a dull one. Learn your power tools with scrap wood before tackling a finished piece. If you are looking at a complete set, you can compare options in the beginner tool guides and see which fits your space and projects.
For a deeper look at what a starter shop needs, Woodworking Tools for Beginners: What to Buy First lays out a buying order, and Woodworking Measuring Tools: Rules, Tapes and Squares explains how to choose and check layout tools. Woodworking Hand Tools Only: A Step-by-Step Guide to Building Without Power is a good read if you want to build with fewer machines, and Woodworking Power Tools: What Each Does and Safety Basics covers the machines in more depth. Once you have the basics, Woodworking Tools and Jigs: 5 Shop Jigs That Improve Accuracy (2026) shows how simple jigs improve repeatable cuts.
FAQ
What is the single most useful woodworking tool?
A reliable measuring and marking setup is the most useful starting point, because every cut depends on an accurate line. A combination square and a sharp pencil or marking knife cover most early needs.
Do I need power tools to start woodworking?
No. Many projects can be built with hand saws, planes, chisels, and clamps. Power tools speed up work and make some cuts more consistent, but they are not required for basic projects.
Which tool should I buy after measuring tools?
Clamps are usually the next priority, since glue-ups and assemblies need them. After that, a saw that matches your projects, either a handsaw or a circular saw with a guide, makes sense.
How do I check if a square is accurate?
Place the square’s stock against a straight, trusted edge and draw a line along the blade. Flip the square and draw a second line along the same edge. If the lines do not match, the square is out of true.
What sandpaper grits should I use?
For most projects, start around 80 or 120 grit to remove marks and flatten surfaces, then move to 180 or 220 grit before finishing. Skipping steps leaves scratches that become visible under finish.
Is a table saw necessary for beginners?
It is not necessary, but it is very useful for consistent rip cuts. Beginners can often get by with a circular saw and a straightedge guide until they have space and budget for a table saw. Always follow the manufacturer’s safety instructions and consult an experienced woodworker or instructor before using power tools.
How should I store my woodworking tools?
Keep hand tools in a dry place, wipe metal surfaces lightly with a protective oil to prevent rust, and store cutting edges separately to protect them. Hang saws and clamps so they do not get bent or misaligned.
Conclusion
The most useful woodworking tools are the ones that help you measure, cut, hold, drill, and smooth accurately. Start with a combination square, a marking tool, a saw, clamps, and a sander, then add machines as your projects demand them. Practice on simple builds like birdhouses before tackling furniture, and your skills and shop will grow together.
Ready to choose one?
About Audrey Hayes
Audrey Hayes is part of our editorial team and reviews and edits our woodworking guides, checking product details against manufacturer specifications and owner feedback.