By Audrey Hayes
Updated November 2026
Scribing tools for woodworking let you mark fine, precise lines that guide saw cuts, chisel work and joint layout. This guide covers the main types, when each one makes sense, and how to use them to get tighter fits. By the end you will know which scriber suits your project and how to keep your marks accurate.
Why a Scribed Line Beats a Pencil Line
A pencil line has width, and that width is where errors hide. A scribed line is cut into the surface fibers, so a chisel or saw can register directly in it. For joinery, where a gap of a few thousandths of an inch shows, that difference matters. Scribing also leaves a line that does not rub off during layout or handling.
Shopping for one? See our guide: Top 7 Wood Router in Tools for Woodworkers Compared.
The Main Types of Scribing Tools
- Marking knife: A thin blade, often with a bevel on one side. It cuts a crisp line across the grain and is the standard choice for dovetails and tight-fitting joints.
- Marking gauge: A stock with a fence and a pin or wheel that runs parallel to an edge. Use it to mark consistent offsets for tenons, mortises and panel grooves.
- Mortise gauge: A marking gauge with two pins set at a fixed spacing, so one pass marks both sides of a mortise.
- Dividers or compass: Two pointed legs for stepping off equal spaces, transferring dimensions and laying out arcs.
- Scratch awl: A sharp point for marking hole centers and short reference marks, especially on hardwood where a pencil can smudge.
How to Scribe a Line Step by Step
- Plane or sand the surface flat and dry. Oil, dust or raised grain will make the line wander.
- Set the gauge to the measured distance. Check it against a rule, not against a previous setting.
- Hold the fence or square firmly against the reference face. Keep the gauge upright so the pin or wheel stays at the same depth.
- Pull the tool toward you in one smooth pass. Repeated passes widen the line and lose accuracy.
- For a knife line on a square edge, use a square as a guide and angle the blade slightly toward the waste side. This keeps the cut edge on the line.
- Deepen the line lightly with a chisel or the same tool if the saw or chisel needs a groove to follow.
Setting Up a Marking Gauge
Most gauges have a thumbscrew that locks the fence and a second screw or wedge that fixes the beam. Set the fence first, then check the pin’s distance from the fence at both ends of the beam. If the distance changes, the beam is out of square to the fence and the gauge will drift.
Choosing the Right Tool for the Job
| Task | Best tool | Why |
|---|---|---|
| Dovetail layout | Marking knife | Crisp lines on end grain and cross grain |
| Tenon shoulders | Marking gauge | Consistent offset along the length |
| Mortise walls | Mortise gauge | Both sides marked in one pass |
| Stepping off spacings | Dividers | Equal increments without a rule |
| Hole centers | Scratch awl | Precise point that will not smear |
Common Mistakes
- Scribing on a surface with dust, oil or tear-out. Clean and flatten first.
- Pulling a knife or gauge in several passes. One clean stroke gives a truer line.
- Letting the gauge fence wander away from the reference edge. Keep steady pressure.
- Using a dull knife. A worn blade crushes fibers instead of cutting them.
- Trusting an uncalibrated gauge. Check the setting on both ends of the beam.
Recommended Gear
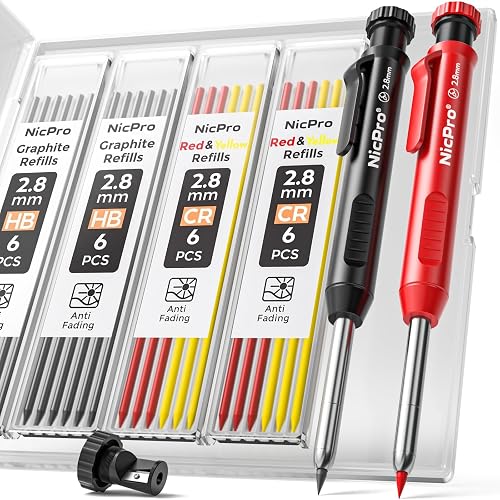
- Marking gauge: A wheel-type gauge with a locking fence makes repeatable offsets easy to set and hold. View on Amazon
- Marking knife: A sharpenable knife with a fine bevel gives the crispest line for joinery layout. View on Amazon
- Dividers: A pair of woodworking dividers lets you step off spacings and transfer measurements accurately. View on Amazon
For more on the measuring side of layout, see Woodworking Measuring Tools: Rules, Tapes and Squares. Hand tools in general are covered in Hand Tools for Woodworking: Uses, Safety and Sharpening, and a broader overview of building skills appears in Woodworking Techniques: Measure, Cut, Join, Sand, Finish.
FAQ
Is a marking knife better than a pencil?
For joinery, usually yes. A knife line is narrow and sits in the fibers, so chisels and saws can register on it. For rough layout or cutting to a generous allowance, a pencil is still practical.
How often should I sharpen a marking knife?
Sharpen whenever the line starts to tear or crush instead of cut cleanly. Frequent light honing keeps the edge consistent and is faster than grinding back a dull blade.
Can I use a marking gauge on plywood?
Yes, but the veneer can splinter along the line. Score the line lightly first, use a sharp pin or wheel, and cut on the waste side to keep the edge clean.
Conclusion
Scribing tools for woodworking give you lines you can trust, which translates directly into tighter joints and less fitting time. Start with a marking knife and a gauge, learn to set and hold them accurately, and add dividers and an awl as your projects call for them. Consistent practice on scrap will show you quickly how much a clean line improves your work.
Related reading
Ready to choose one?
About Audrey Hayes
Audrey Hayes is part of our editorial team and reviews and edits our woodworking guides, checking product details against manufacturer specifications and owner feedback.