 By Claire Whitaker
Updated November 2026
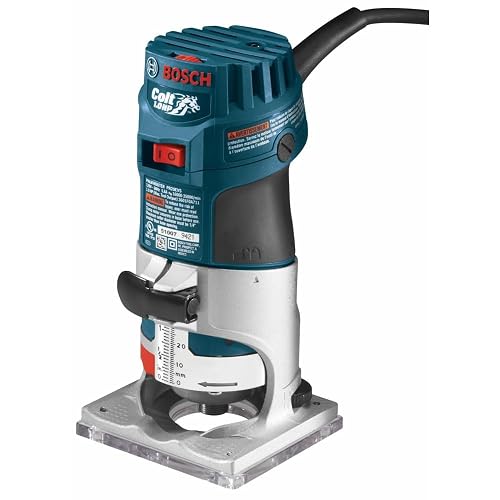
A hand router machine for wood is a handheld power tool that spins a cutting bit at high speed to shape edges, cut grooves, trim laminate and decorate surfaces. This guide walks you through how these tools work, how to pick the right fixed-base or plunge model, how to set up and make your first passes safely, and the mistakes that most often ruin a good board. By the end, you will know how to get clean, repeatable results with a hand router on real projects.
What a Hand Router Machine for Wood Actually Does
A router is a motor mounted in a base that holds a collet, and the collet grips a bit. The motor typically runs between about 10,000 and 25,000 RPM depending on the model and the bit diameter. Because the spinning bit does the cutting, a router can produce profiles, rabbets, dados, mortises and flush trims that a saw cannot.
Shopping for one? See our guide: 7 Best 4×8 CNC Wood Router Machines of 2026: Buyer's Guide.
Hand routers are designed to be moved by hand across the workpiece, guided by a fence, a template, a straightedge or a bearing that rides along an edge. That makes them very different from a router table, where the router is mounted upside down and the wood moves past the bit. Both have their place, but a hand router is the more versatile choice for large panels, installed work and anything too big to feed across a table.
Choosing the Right Hand Router
Most woodworkers end up with one of two basic designs, and understanding the difference will narrow your search quickly.
- Fixed-base routers have the motor locked at a set depth. You set the depth by turning the bit up or down in the collet before you start. They are usually lighter, simpler and well suited to edge profiling and light work.
- Plunge routers let you lower the spinning bit straight down into the wood and lock it at a chosen depth. They are the right tool for mortises, stopped grooves, inlays and any cut that does not start at an edge.
Beyond base style, check these specifications before you buy:
- Motor horsepower and amperage. Manufacturers list either horsepower or amps. A motor in the 1.5 to 2.25 horsepower range covers most hobby and furniture work. Larger bits and deep cuts in hardwood benefit from more power.
- Collet size. The most common collet sizes are 1/4 inch and 1/2 inch. A 1/2 inch collet accepts stouter bits with less vibration, while 1/4 inch shanks are widely available and cheaper to replace.
- Variable speed. Electronic speed control lets you slow the bit for large-diameter cutters and raise it for small ones. It also helps prevent burning on dense hardwood.
- Depth adjustment. Look for a smooth, repeatable depth stop. Fine-adjust knobs save time when you are sneaking up on a final dimension.
- Dust port. A port that fits a standard shop vacuum hose keeps chips out of your sight line and reduces airborne dust.
Budget and Premium Options
A budget pick is usually a fixed-base router with a modest motor and basic depth adjustment. It handles edge profiles and trimming well. A premium option adds a stronger motor, better bearing alignment, smoother height adjustment and a more solid base. If you plan to do frequent plunge work or cut hardwoods, the extra refinement pays off. For occasional use, a mid-range model often does everything you need.
Gear You Need Before You Start
Before you touch the workpiece, gather the supporting equipment. The list below covers what most projects require.
- The router itself, with the correct collet installed and tightened.
- A set of straight, roundover, chamfer and rabbeting bits in the sizes your project needs.
- A straightedge guide or edge guide attachment for straight cuts.
- Clamps sufficient to hold the workpiece firmly, with no part of the clamp in the cutting path.
- Sacrificial backing board to prevent blowout on the exit side of through cuts.
- Safety glasses, hearing protection and a dust mask or respirator rated for wood dust.
- A shop vacuum connected to the router dust port.
- A test piece of scrap of the same species and thickness as your project.
Setting Up a Hand Router for Clean Cuts
Good results come from preparation. Work through these steps in order every time.
Step 1: Install the Bit Correctly
Unplug the router. Insert the bit shank into the collet until it bottoms out, then back it out about 1/16 inch to avoid bottoming and to reduce vibration. Tighten the collet nut firmly with the wrenches supplied. A loose bit is the most dangerous mistake a beginner can make.
Step 2: Set the Depth
For a fixed-base router, lower the motor until the bit is at the approximate depth you need, then lock it. For a plunge router, set the depth stop. Make your first pass shallow, around 1/8 inch or less, and increase depth on subsequent passes. Taking several light passes is safer and produces a better surface than one deep cut.
Step 3: Establish the Direction of Feed
Routers rotate clockwise when viewed from above. Feed the router counterclockwise around the outside edge of the workpiece, so the bit cuts into the material rather than pushing it away. On an inside cut, the direction reverses. Getting this wrong causes the router to climb or chatter.
Step 4: Make a Test Cut
Run the router across your scrap. Check the depth, the surface finish and whether the bit is tracking straight. Adjust before cutting your actual project.
Step 5: Rout with Steady Motion
Turn the router on away from the workpiece and let it reach full speed. Lower it onto the wood, keep the base flat, and move at a steady pace. Feeding too slowly burns the wood; feeding too fast leaves ridges and stresses the motor. Listen to the sound: a smooth, even hum means you are at a good rate.
Common Techniques and Their Settings
The table below summarizes typical approaches for common tasks. Actual settings depend on your router, bit and species, so treat these as starting points and verify on scrap.
| Task | Recommended Approach | Typical Depth per Pass |
|---|---|---|
| Edge roundover | Fixed base, bearing-guided bit | Full profile in 2 to 3 passes |
| Straight dado | Edge guide or straightedge, straight bit | 1/8 to 1/4 inch per pass |
| Mortise | Plunge router, spiral or straight bit | 1/8 inch per plunge step |
| Flush trim | Flush-trim bit with bearing | Full depth in one pass when stock is thin |
| Decorative chamfer | Chamfer bit, fixed base | Full profile in 1 to 2 passes |
Common Mistakes to Avoid
- Taking too much material at once. Deep single passes overload the motor, burn the wood and deflect the bit. Work in stages.
- Feeding in the wrong direction. Climb cutting can tear the grain and yank the router out of your hands.
- Skipping the backing board. Without support, the exit side of a through cut blows out and chips the edge.
- Letting the base tip. A router tipping on a narrow edge produces an uneven groove. Keep the base flat and use a bearing or fence.
- Ignoring bit condition. Dull or resin-coated bits burn wood and strain the motor. Clean them with a resin remover and replace worn cutters.
- Leaving clamps in the path. Hitting a clamp with a spinning bit can ruin the bit and the project.
Tips for Better Results
- Let the router reach full speed before it touches the wood, and let it stop completely before you lift it out.
- Practice on scrap of the same species. Hardwoods like oak and maple behave differently from softwoods like pine.
- Use a router with a soft-start feature if you have one; it reduces the kickback that happens when the bit grabs.
- Keep spare bits sharp, and store them in a rack so their edges do not chip.
- For long straight cuts, tape a guide strip to the workpiece and run the base against it.
- If you are new to routing, read the manufacturer’s manual for maximum speed and recommended bit diameter, and stay within those limits.
Recommended gear
A fixed-base router is the most useful first machine for edge profiling and general shop work. Look for a model with a smooth depth adjustment and a 1/4 inch or 1/2 inch collet to match your bit collection. View on Amazon
A plunge router is the right second machine once you start cutting mortises, stopped grooves and inlays, since it lets you start cuts away from an edge. View on Amazon
A straight router bit set gives you dados, rabbets and grooves in standard widths, and a roundover bit set covers most edge-softening needs. View on Amazon
An edge guide attachment keeps your cuts parallel to the board edge and makes straight routing far more accurate than freehand work. View on Amazon
For more background on tool choice, see 4 Best Router Machines for Wood Picks for Hobbyists (2026) and 7 Best Wood Router Milling Machine Options for Hobbyists in 2026. If you want to explore the handheld side of the category, Wood by Wright Router Plane Compared: 7 Best Picks for 2026 covers a different style of hand tool.
FAQ
What is the difference between a hand router and a router table?
A hand router is moved by hand across a stationary workpiece, while a router table holds the router upside down and the wood moves past the bit. Hand routers suit large panels and installed work; router tables suit small, repeatable cuts.
Should I buy a fixed-base or plunge router first?
A fixed-base router is the more common first purchase because it handles edge profiles and trimming well. Add a plunge router when you need mortises, stopped grooves or cuts that start in the middle of a board.
What size collet do I need?
Check the shank diameter of the bits you plan to use. Many routers accept 1/4 inch and 1/2 inch shanks, sometimes with a reducer. Match the collet to your most-used bits.
Why does my router burn the wood?
Burning usually comes from feeding too slowly, taking too deep a pass, running a dull bit or using the wrong speed for the bit diameter. Reduce depth, speed up your feed and sharpen or replace the bit.
How do I prevent tear-out on the exit side?
Clamp a sacrificial backing board under the workpiece, or make a shallow first pass before the final cut. Running the final cut with the grain direction also helps.
Is a hand router safe for beginners?
It can be used safely with proper setup, a firm grip, eye and ear protection and slow, shallow passes. Because routers spin at high speed, read the manual and consider a supervised session with an experienced woodworker if you are new. Consult a professional if you are unsure about any part of the setup.
How often should I replace router bits?
Replace or resharpen a bit when you see dull edges, chipping, excessive burning or rough cuts that did not occur before. Cleaning resin buildup regularly extends bit life.
Can I use a hand router for inlay work?
Yes. A plunge router with a guide bushing and a template is the usual setup. Make the template first, rout the recess, then cut the matching inlay with the same template.
Conclusion
A hand router machine for wood is one of the most flexible tools in a woodworking shop, capable of edge profiles, grooves, mortises and trims. Choose between fixed-base and plunge designs based on the work you do most, set up carefully and always test on scrap first. With steady feed, sharp bits and proper safety gear, you can produce clean, accurate results on a wide range of projects.
Related reading
Ready to choose one?
About Claire Whitaker
Claire Whitaker is part of our editorial team and reviews and edits our woodworking guides, checking product details against manufacturer specifications and owner feedback.